How to create a “Gang” sheets – 7 Easy Steps!

Here is a step by step example on how to set up your gang sheet. A gang sheet is defined as either multiple images of the same design or color placed on one single sheet.
The designs or logos can be cut apart by using scissors or can be machine cut. You pay one price for the sheet so the more images you can fit on the sheet, the lower your unit price per image will be. The first thing you need to do is set up the page layout in your drawing program.
Using Adobe Illustrator or Corel Draw, go to the page set up and enter the size of the transfer sheet offered. Keep in mind the “live area” of the sheet is where your images will need to be placed. Printing outside the “live area” can lead to your logo or print getting cut off of the paper. Carefully place your images keeping in mind you will need at least 1/2 of an inch between each design to allow for cutting.
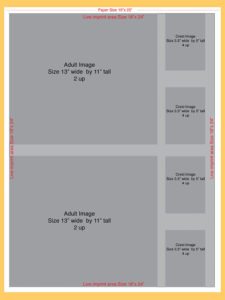
18″ x 24″ Live Area
It is important to “embed” your images and save your file before sending an art file to production. Many programs such as Adobe Illustrator will allow you to place an image. The essentially creates a thumbnail image within the page. Programs do this in order to keep file sizes smaller. For custom heat transfer printing, we will want to have one file with all of the placed images included as an embedded image. Be sure your images do not overlap one another. Also, place your images “right reading” which means do not “reverse” or “mirror image” your artwork. Our software will do this for you. This way you will be able to read and see the transfer exactly as it will be printed. Be sure you check each size before sending in the artwork. Be sure to follow the art requirement guidelines when placing your custom heat transfer orders. Some products require a proof of your image on a colored background to allow the transfer manufacturer to see the white plate.
Create gang sheets 7 easy steps
How to create gang sheets in 7 easy steps | Best Heat Transfers
Step 1
Set you page size to either 11″ x 17″ for our Large sheet of 18″x24″ for the XL sheet
Step 2
Place your vector image to the top left corner of the page.
Step 3
Create a 1/2″ x 11″ box to create your cutting spacing
Step 4
Duplicate your original image by pressing Command + Shift+D and repeat until you reach the end of the sheet.
Step 5
Create a 17″ x 1/2″ box to create your vertical cutting space
Step 6
Select the top row of graphics and then duplicate all by pressing Command+Shift+D and repeat until the end of the sheet.
Step 7
Save your image files and be sure to embed all images before saving.


